This video tutorial will show you how James Findley created this nano size aquascape which he titled ‘Scree’. Book available here.
If you want to see more videos in the future you can support us by;
- Buying our book and/or
- Sharing our videos 🙏🏽
We asked our followers if they would prefer a shortened video or a full length one. The feedback we got was an almost unanimous request for a full length video… so we’re showing you pretty much the whole process- we hope you find it useful!
Ask any questions you like in the comments section and we’ll do our best to answer you. We hope you enjoy the video!
Setup Specification
- Aquarium: 45-F – 45x24x16 cm, with a volume of 17.28 litres
- Light: Aquasky 451
- Mirror Unit – 451
- Filter: Super Jet ES-150
- Advanced CO2 Kit
- CO2 Parts Set
- CO2 Diffuser: Do!aqua Mini Music Glass
- CO2 Non-Return Valve
- Filter Glass Inlet: Mini V-1
- Filter Glass Outlet: Mini P-2
- CO2 Drop Checker
- Substrate: ADA Amazonia Powder approx 3l
- Substrate: Power Sand Special
- Rocks: Yamaya
- Plant: Marsilea crenata
- Plant: Vesicularia dubyana ‘Christmas’ moss
- Plant: Eriocaulon cinereum
Photos
Video Transcript
Welcome to The Green Machine, the aquascaping experts.
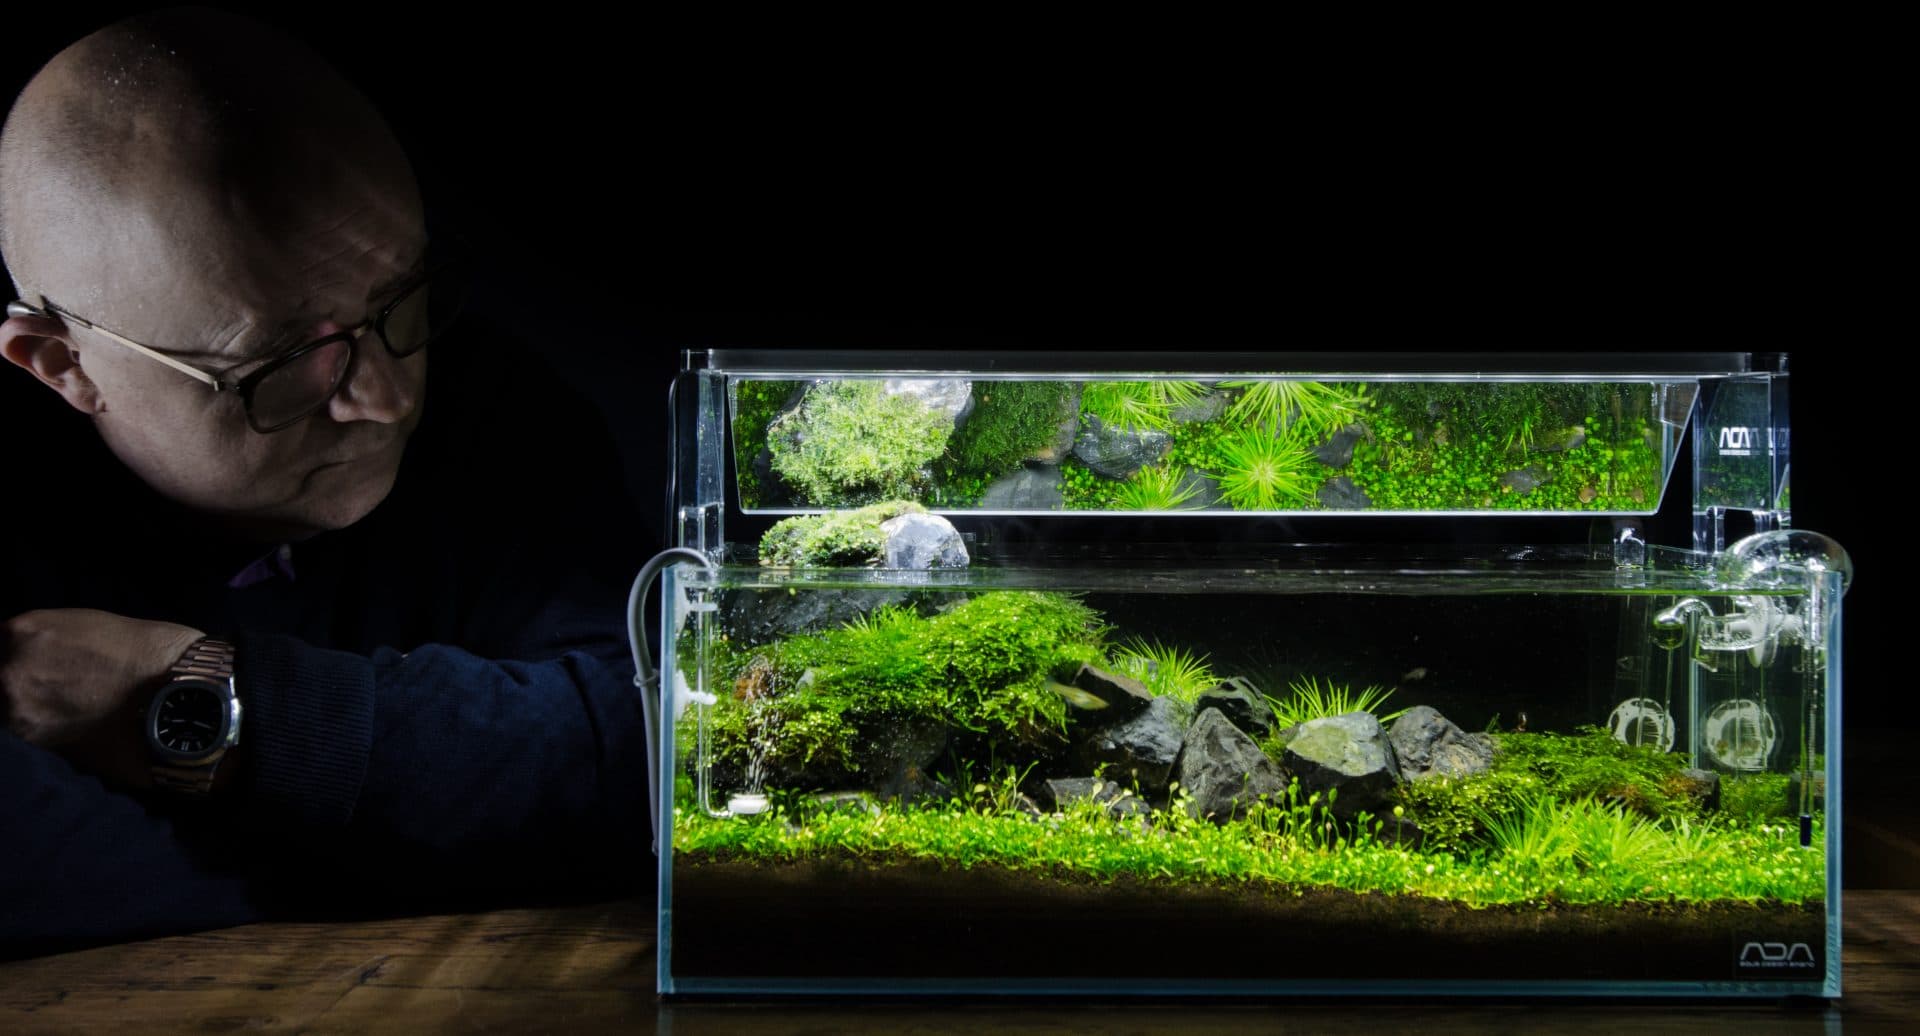
This video tutorial will show you how James Findley created this nano size aquascape which he titled ‘Scree’.
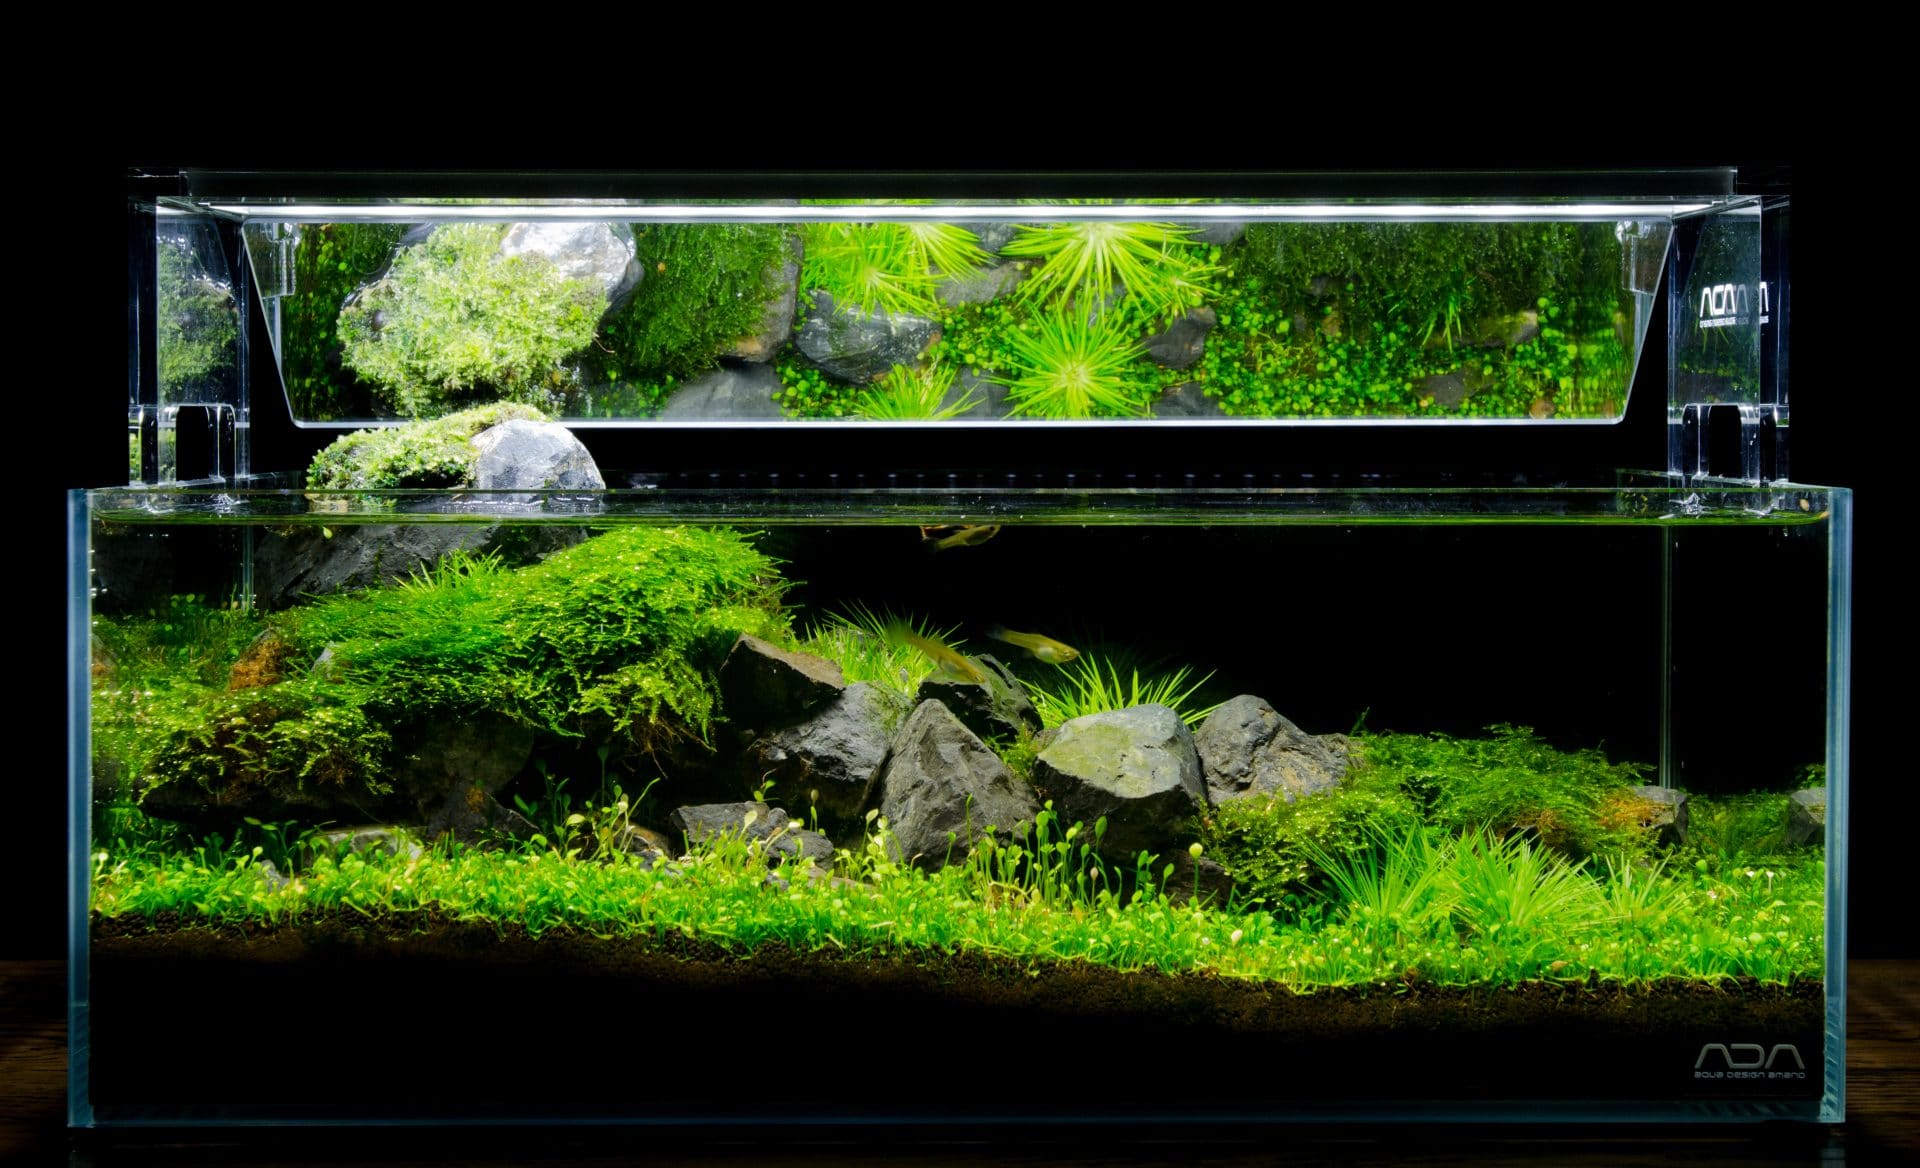
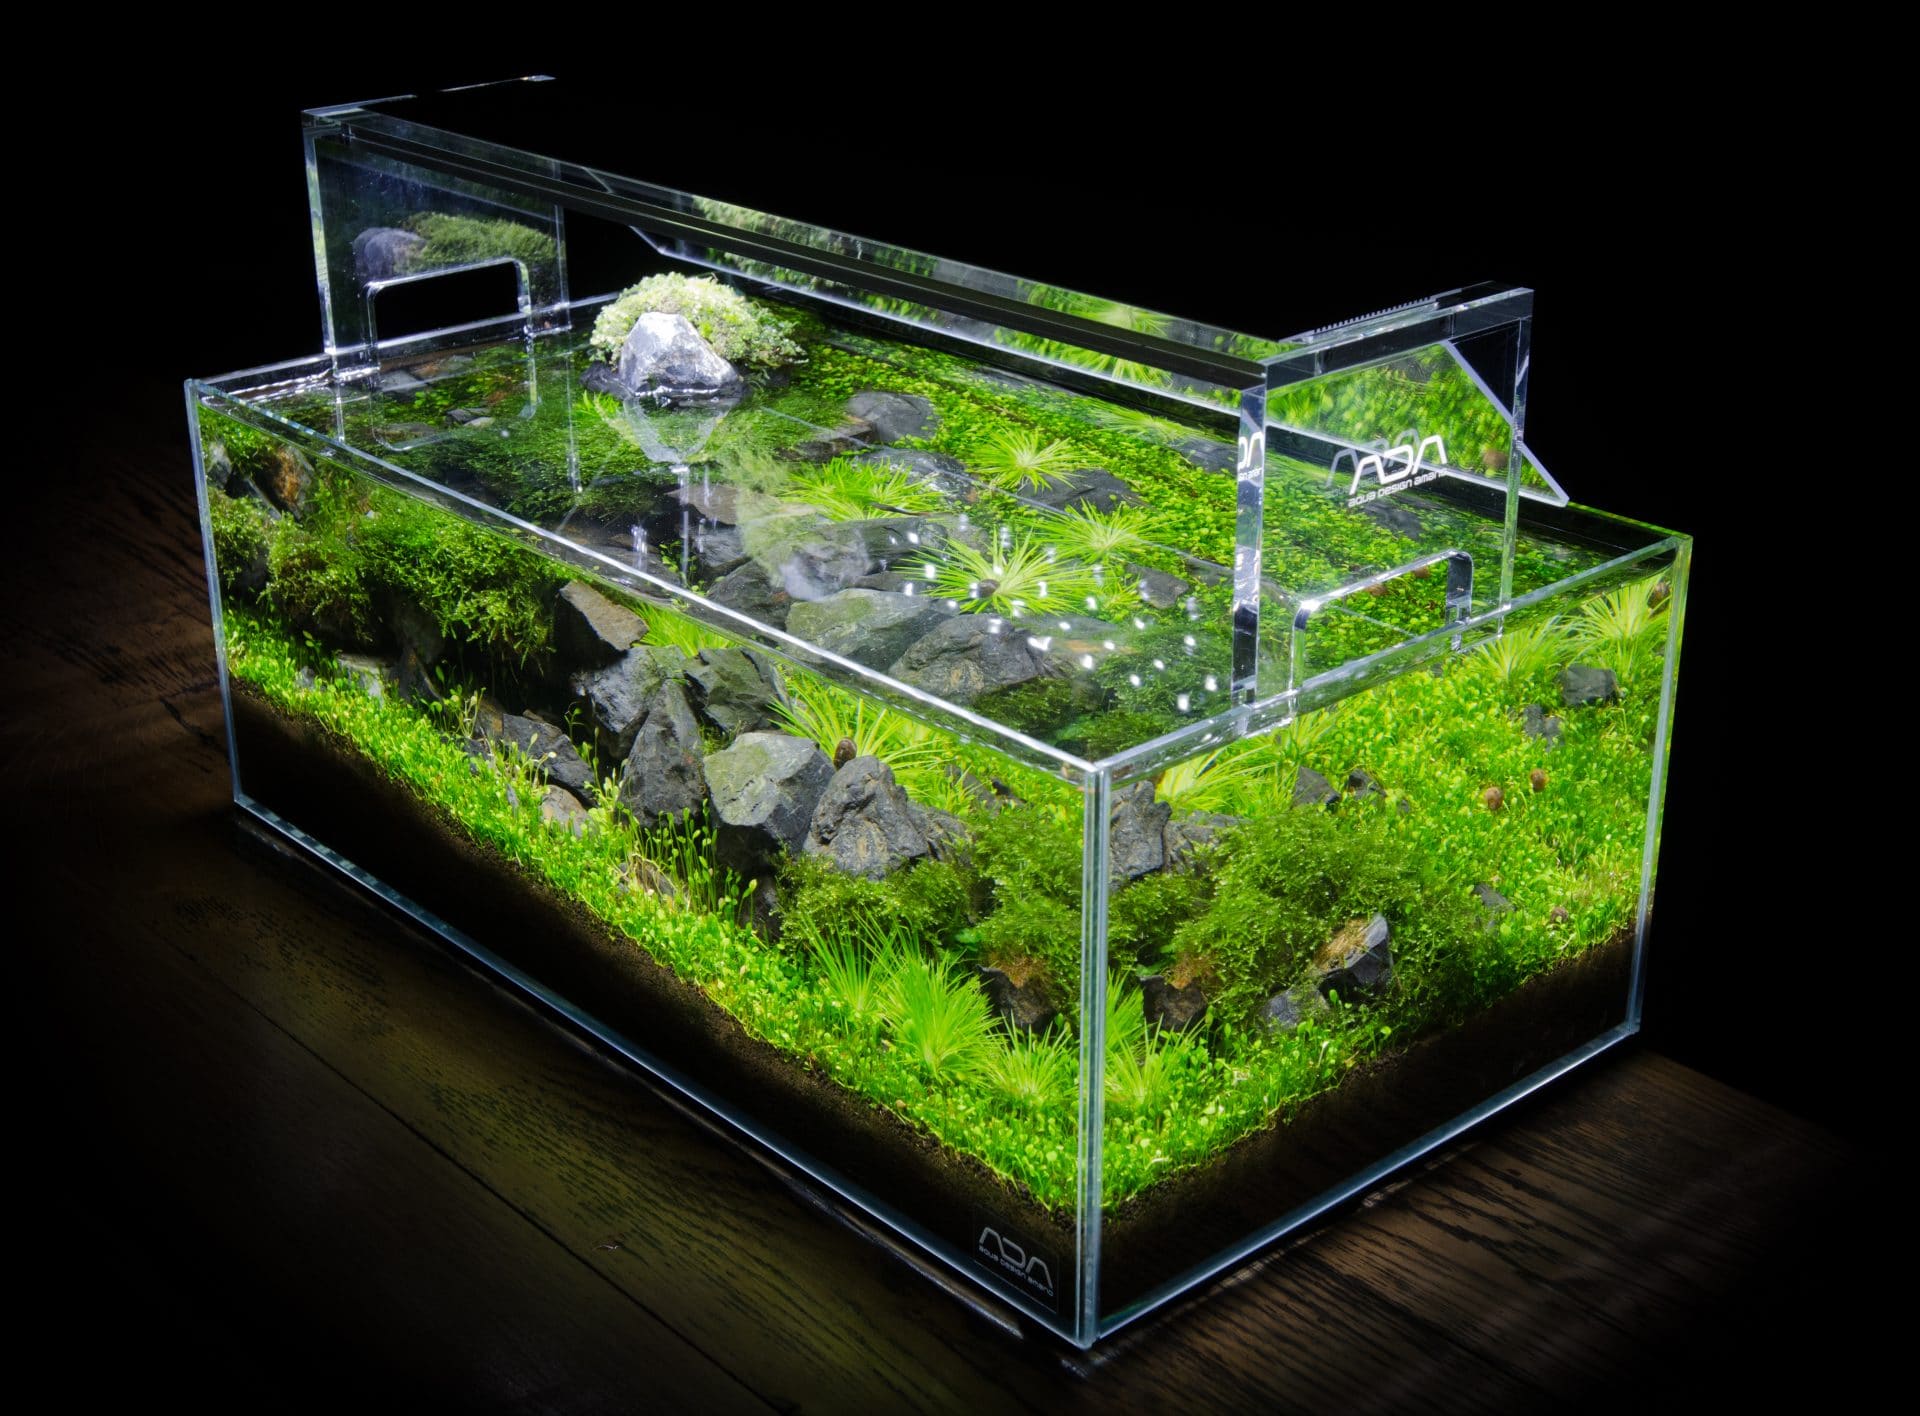
Here you can see the grown in aquascape… the end result of this tutorial.
We asked our followers if they would prefer a shortened video or a full length one. The feedback we got was an almost unanimous request for a full length video… so we’re showing you pretty much the whole process- we hope you find it useful!
But first…
James introduces The Art of Aquascaping Book.
The empty tank is the starting point for any new aquatic creation.
The ideal aquarium is one which the viewer doesn’t notice- an invisible container for your aquascape.
This is an open-top rimless and braceless aquarium with a minimal aesthetic which has the practical advantage of allowing instant access for water changes, trimming and pruning of plants and other maintenance work.
This aquarium uses low iron glass which has higher clarity, and a slightly higher price, than standard float glass. This means plant and fish colours will appear truer.
This aquarium measures 45x24x16 cm, with a volume of 17.28 litres. Tanks of around this size and smaller are commonly referred to as ‘nano’ tanks. They can make an excellent feature, the small size means they can find a place in almost any home.
For this video we’ve positioned a second camera directly above the aquarium, so you can see what James is seeing.
—
The first stage is to add the substrate layer.
In order to grow plants, it is important to create the best environment possible for plant roots.
Substrate additives are substances that aid plants in one way or another. They may be added under, within, or on top of the base substrate layer. Usually they are spread evenly across areas where plants will grow.
Here you can see clearly that James is using several additives as the bottom layer of substrate.
03:24
An aquascaping toolkit is extremely useful. You can see James’ to his left.The first main layer is a base substrate layer of volcanic pumice (often called lava stone) which is very porous with a large surface area perfect for the colonisation of beneficial bacteria. This layer will act as an excellent secondary biological filter.
On top of this goes a finer primary plant substrate which is designed for optimal plant growth and makes it easier to anchor new plants in position.
You’ll see James regularly using a paintbrush to reposition and neaten the substrate as he proceeds. A paintbrushes is a useful and affordable tool for the aquascaper.
A jug can be used for accurate pouring of substrate.
Here the substrate is positioned to create a gradual slope from one corner down tot he diagonally opposite corner.
Once the substrate layer has been built it is time to add hardscape materials.
6:00 APPROX
Natural materials such as wood and stone may be used to structure and decorate an aquascape. These are known as hardscape, décor or layout materials.
Here James uses a gray-blue variety of stone. You can see how he places each one.
He titled this aquascape ‘Scree’ which is defined as “a mass of small loose stones that form or cover a slope on a mountain”, and you can start to see why.
When choosing rocks and stones for aquascaping you should avoid calciferous varieties which will increase water hardness or alkalinity.
To test whether a rock is calciferous you can put some vinegar on it, if it bubbles it is calciferous. If it does not bubble it is inert and safe for use in your aquascape.
James works quite quickly placing the stones. For beginners it can be a challenge to achieve natural-looking stone placement, but with time and practice you will achieve good results faster.
You can learn more about hardscape in our book, and by watching our other aquascaping videos.
10:40
James uses a paintbrush once more to neaten the substrate around the stones.To his right, you can see that James has pre-selected a number of stones, laying them out on a white sheet so he can see them clearly.
You can see that the ‘Scree’ is now forming. Nearly this whole slope has been covered with small, loose looking stones.
You can also see how easy it is to work with an open-top, rimless, braceless tank.
15:00
Some rocks have had Vesicularia dubyana ‘Christmas’ moss attached to them using cotton. This is an excellent way to anchor moss to stones. It should grow and spread across surrounding hardscape materials. This is a quick and effective way to make an aquascape look older than it is.This moss comes from Brazil. It is very popular in aquascaping because of its fir tree-like branch structure. It grows well on wood and stones and needs pruning to keep a desired shape.
These ‘moss stones’ are placed in and around the other stones. With this addition of this green colour the layout starts to look alive.
Some advantages to creating a smaller aquascape are the short amount of set-up time, and lower cost due to less materials used. We go into more detail about aquarium choice in our book.
19:27
James sprinkles smaller pieces of rock amongst his layout to give a more natural look. In nature it is common to have stones of varying sizes next to one another which have been weathered to varying degrees.
20:10
Checking your layout from all angles is essential. Here James moves to the front of the aquarium to check his work.Final tweaks of the hardscape should be completed before moving on to the planting stage.
When adding plants and mosses to an empty aquarium, make sure they stay wet throughout, or they may die. A spray mister is ideal for this.
22:00
When it comes to filling the aquarium with water, James sometimes places an old plastic bag on top of the layout to prevent the water disturbing the substrate and hardscape.You should always be careful when filling your aquarium. It doesn’t feel good to watch your newly created layout being destroyed by flowing water. Patience is a must!
We’ll speed the video up now, as its not the most interesting part!
22:47
Now the aquarium is half full which can be easier to plant than a full aquarium. Experiment and find a method which works best for you.
James uses aquascaping tweezers to plant small plugs of Marsilea crenata into the substrate.
This plant is a small fern which features tiny leaves that are usually less than half a centimetre in diameter. As it grows it spreads to create a dense carpet of between 1 and 3 centimetres in height. It can often be found in rice fields in Asia.
When planting small plant portions, the task is made much easier when using fine substrate grain sizes. This is because the smaller grain size allows the small roots of the plantlets to grip the substrate better. This improves plant growth, reducing the risk of plantlets coming loose and floating to the top of the aquarium when water is added, which can be incredibly frustrating.
Plants should be prepared before working, split into the sizes required and any excess mineral wool removed. Mineral wool is a material commonly used to grow small plants before they are sold but not all plants will use mineral wool when you buy them.
Next, the plants should then be laid out on a flat surface or board which should be placed nearby or held in one hand while planting with the other, just as an artist would work at his easel. Even at this stage, the plants should be kept misted with a fine water spray at intervals to retain their moisture.
When using good quality substrate, after planting, lighting should be kept to about 6 hours for several weeks, and no dosing with liquid fertiliser should be carried out for 3-4 weeks, or until the plants show signs that they are in need of fertilisation. However there are speciality fertilisers which can be used early, providing a source of readily available potassium and rooting hormones which may be dosed daily from day one of planting, this is hugely beneficial to early growth.
For up to date fertilisation advice, visit our website.
All plant carpeting varieties will need reasonably regular trimming to keep them looking both compact and pristine. Cutting back grasses such as Marsilea crenata will actively encourage new root development. This may be done with a good quality pair of household scissors, although there are specialist, long-reach aquascaping scissors available.
For the aquascaper, plants equate to the artist’s box of paints and each plant can be considered as a different colour or shade within the box.
The best way to learn about planting schemes is simply to practice with as many species as you can. This hands-on experience is the only real way for you to get a personal feel for each species’ growth patterns. Over time, with practice, you will be able to select species for particular layouts quickly.
Our advice is to plant as heavily as you can afford from day one. This gives the aquarium the best start possible. It also means your aquarium will look mature more quickly. You can see how James is placing the small plugs at regular spaces throughout the areas where he wants them to grow. With good maintenance, these will soon grow into a unified carpet like covering.
The carpet effect is popular in aquascaping. They are similar to grass lawns in gardens.
One tip to create a successful aquatic carpet is to use a light source which is powerful enough to penetrate to the bottom of your tank and provide enough light for the carpet. This way the plants will stay compact without the need to stretch up for more light.
We’ll speed the video up a bit for the rest of the planting section.
As we said earlier, we’re showing you every plant being added, as has been requested by many of our viewers. We hope that some of you find it useful to see the whole process, as this shows exactly how much work went into the setup of this layout.
28:59
Here James uses a wet and dry vacuum to remove debris from the surface of the water. You can also do this with a simple net.
30:08
This light is an LED. LEDs are lightweight and highly efficient, making them more environmentally friendly and less expensive to run than higher powered alternatives such as metal halide.
In our experience to date, LEDs are only suitable for planted aquariums up to 60cm high.
We returned to film this aquarium some weeks later when it had grown in. In this time the aquascape received regular maintenance to ensure healthy plant growth.
33:30
Now that the aquascape has grown in, the plants are a lush green colour. The result is vibrancy and life.
Eriocaulon cinereum can be seen with its spiky looking leaves. This plant was planned for the initial planting but wasn’t received on time, so it was added shortly after filming.
This plant is easy to flower which results in long tall stems that shoot upwards. Sadly it was not flowering at the time of filming this video.
Here you can see the aquascape with all equipment operating.
On the left side you can see a CO2 diffuser which is being fed by a pressurised CO2 bottle which is out of sight behind the aquarium. The CO2 diffuser increases the surface area of CO2 by separating it into smaller bubbles. These bubbles flow through the water and some CO2 enters the water where it can then be used by the plants.
When CO2 is injected into an aquarium, it forms carbonic acid, acidifying the water, lowering pH. Measuring the actual acidity of the water gives an indication of the levels of diffused CO2. The ideal level being about 30ppm (Parts Per Million) in a heavily planted tank.
On the right side there is a CO2 drop checker. The gas present in the water reacts with the drop checker contents resulting in a change in colour. When blue, the water is too alkaline and not enough CO2 is present. When lime-green the correct amount of CO2 is present (around 30ppm).
For a full guide to supplying CO2 to an aquarium, read the CO2 section in our book. Here you will find an explanation for all elements of a pressurised CO2 system.
On the right side you can see the filter inlet and outlet glassware. There is a filter with a pump out of sight which pulls water from the aquarium, filters it and then returns it.
Filtration is an essential process for all aquascapes; it uses beneficial bacteria to convert harmful products (such as plant and fish waste) to nitrates which can be consumed by plants.
For aesthetic purposes, a mirror has been fitted to the light which allows us to see into the top of the aquarium when viewing it from the front.
We hope you’ve enjoyed this video. If you’d like to watch similar videos, visit our website and YouTube channel.
Some of the information in this video has come directly from our book- ‘The Art of Aquascaping’ which covers all techniques involved in creating and maintaining beautiful aquascapes, along with well over 100 colour photos of many beautiful aquascapes created by us.
If you’re a beginner or a pro, you’ll find this book a source of valuable information and inspiration. This is the perfect handbook for you to create your own beautiful planted tanks of any size.
For the first time this information has been compiled into one complete publication.
Its available as an instant PDF download, and in durable hardback or paperback editions with worldwide shipping.
Go to thegreenmachineonline.com for more details and to get a copy for yourself.
Hello, the green machine team! Your aquariums are amazing. It’s pure beauty. Watching pictures and videos of your aquariums realy helps to refresh thoughts and become calm after a hard work day. I appreciate it and wish you all the best. Keep doing what you do.
Denys, Ukraine